
I've spent a lot of time going through installation records, manufacturer specs, and contractor case files for the licensed pros in our Virginia directory, and I've watched this exact job done correctly and done wrong. A French drain is one of the few basement and yard drainage fixes a reasonably capable homeowner can actually install themselves — but it's also one of the most commonly botched, because the parts that matter (slope, fabric, gravel grade, discharge point) are invisible once you backfill the trench. Get any one of them wrong and you've buried a $500 mistake under two feet of dirt.
This is the exact process I'd walk through, in order, whether I was digging it myself on a Saturday or checking a contractor's work before they closed the trench.
What a French Drain Actually Does
A French drain is a gravity-fed trench system: a perforated pipe buried in gravel that gives water an easier path to follow than the soil around it. Water always moves toward the path of least resistance. Clean gravel drains far faster than compacted clay or loam, so once water reaches the trench it flows into the gravel, drops through the perforations in the pipe, and travels downhill to wherever you've told it to go — away from your foundation, a low spot in the yard, or a storm drain.
It doesn't pump anything. There's no motor, no electricity, and nothing to fail except a clog or a mistake in the original slope. That simplicity is exactly why it's DIY-friendly, and exactly why the installation details matter so much — there's no pump to compensate for a mistake later.
Interior vs. Exterior: Which One Do You Need?
People use "French drain" loosely to describe two different jobs, and it's worth being precise before you start digging.
- Exterior French drain (yard/foundation perimeter): Installed outside, along or near the foundation footing, or anywhere in the yard that collects standing water. This is the version most homeowners can DIY. It intercepts surface water and shallow groundwater before it ever reaches your walls.
- Interior French drain (drain tile): Installed inside the basement, usually by cutting a channel into the concrete slab along the interior perimeter and tying it into a sump pump. This is a different job entirely — it involves breaking concrete, working against an active water table, and integrating with a pump, and I'd hire a licensed contractor for it rather than attempt it myself. I cover how that system works, alongside exterior membranes and sump pumps, in how basement waterproofing works.
The steps below are for the exterior version. If your water problem is inside the basement — water on the floor, not just a wet yard — read how to waterproof a basement first to figure out which system you actually need before you start digging.
Tools and Materials
- Flat spade and a trenching shovel (or a rented mini trencher for long runs)
- 4-inch perforated PVC or corrugated drain pipe, ideally pre-wrapped in a filter sock
- Non-woven landscape fabric (not woven weed barrier — you want water to pass through it)
- Clean, washed drainage gravel (often sold as #57 stone) — avoid gravel with fines or dust mixed in
- A line level or a laser level to check your slope as you dig
- Couplings, a pop-up emitter or splash block for the discharge end
- Work gloves, safety glasses, and a garden hose for the final test
Step 1: Call 811 Before You Touch a Shovel
This is not optional and it's not a formality. Dial 811 (the national call-before-you-dig number) at least a few business days before you plan to dig, and the affected utility companies will come out and mark buried gas, electric, water, and communication lines on your property, free of charge. Hitting a gas or electric line with a shovel is a real hazard, and it's one of the few steps in this whole project I'd never skip or shortcut, DIY or not.
Step 2: Plan the Route and the Slope
Walk your yard after a hard rain and watch where the water actually sits or flows — don't guess from a dry day. Map a route from that problem area to a safe discharge point: daylighting downhill at least 10 feet from the foundation, into a dry well, or tying into a sump pit if one exists.
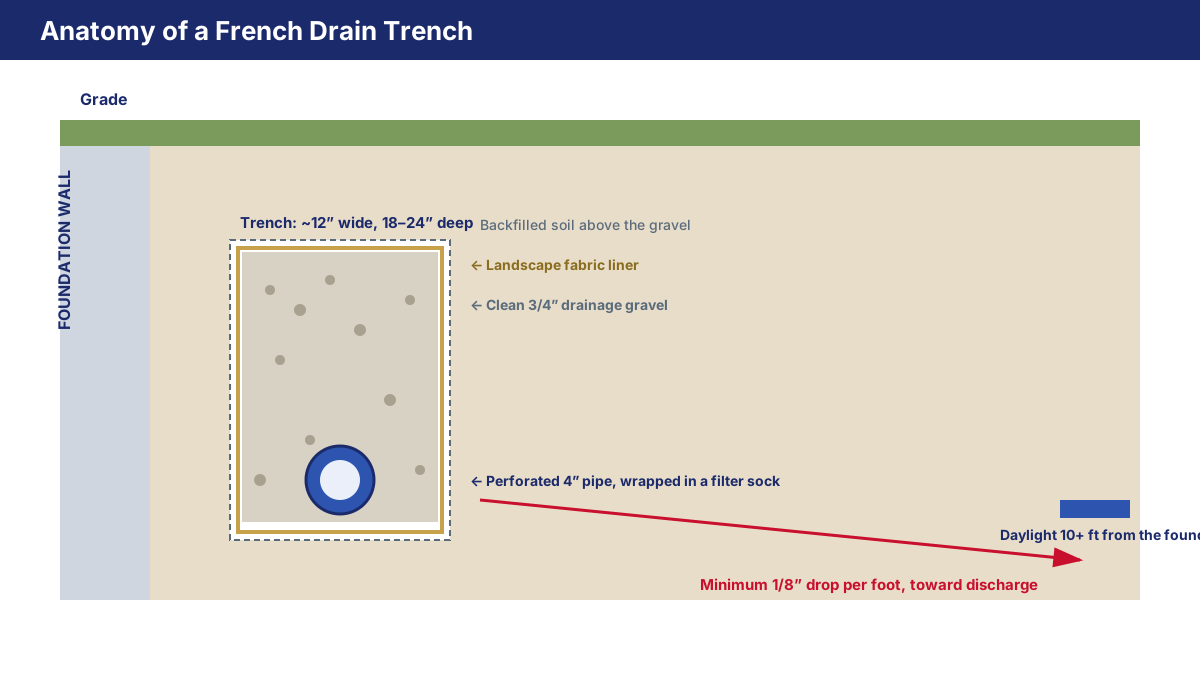
The slope is the single most important number in this entire project. The trade rule of thumb I'd follow is a minimum of 1/8 inch of drop per foot of run (roughly 1%), with 2% preferred wherever your yard's grade allows it. Over a 40-foot run, that's a minimum of 5 inches of total drop from start to discharge. Too little slope and water sits in the pipe and eventually the trench; you can't practically have too much slope on a gravity drain.
Step 3: Dig the Trench
Excavate about 12 inches wide and 18 to 24 inches deep along your planned route, checking your slope every few feet with a line level as you go. Depth matters less than consistency — a trench that's deep in the middle and shallow at both ends will trap water instead of moving it. If you hit heavy clay, over-dig slightly; you'll want a bit of extra room for the gravel to do its job.
Step 4: Line the Trench With Fabric
Lay non-woven landscape fabric along the base and up both walls of the trench, with enough overhang on each side to fold back over the top later. This fabric is the difference between a French drain that works for 20+ years and one that silts up and stops draining within a few seasons — it lets water through while keeping fine soil particles out of the gravel and pipe.
Step 5: Add the Gravel Base
Pour in 2 to 3 inches of clean drainage gravel and rake it level along the bottom of the fabric-lined trench. This bed is what the pipe rests on, and it's your first line of filtration before water ever reaches the perforations.
Step 6: Lay the Perforated Pipe
Set the 4-inch perforated pipe on top of the gravel bed, following your planned slope. If your pipe isn't pre-wrapped in a filter sock, wrap it in fabric yourself before you lay it. On the question of which way the holes should face, I'll be honest that contractors don't fully agree: most manufacturers and installation guides recommend holes down so water enters through the gravel and sock from below, while some contractors intentionally point them up to reduce sediment settling inside the pipe over time. Check the instructions that come with your specific pipe rather than assuming one is universally correct.
Connect pipe sections with couplings as you go, keeping every joint tight and maintaining your slope through each connection.
Step 7: Cover the Pipe and Wrap the Fabric
Add more clean gravel over and around the pipe until it's fully covered, then fold the landscape fabric you left overhanging on both sides back over the top of the gravel, overlapping the seam. You're now looking at a fully wrapped gravel-and-pipe envelope, with fabric on all sides keeping soil out permanently.
Step 8: Backfill and Finish the Surface
Backfill the remaining trench with soil, compacting lightly in layers rather than dumping it all in at once, which tends to leave the surface uneven as it settles over the following weeks. Cap it with topsoil and sod, mulch, or decorative stone depending on where the trench runs through your landscaping.
Step 9: Confirm the Discharge Point
Before you consider the job finished, walk to wherever the pipe exits and confirm it does one of three things: daylights at least 10 feet from the foundation onto a downhill slope, empties into a dry well, or ties into an existing sump pit. A French drain that discharges too close to the house just recirculates the same water back toward your foundation — a surprisingly common mistake that undoes the entire project.
Step 10: Test It
Run a garden hose at the highest point of the drain for several minutes and walk the route to confirm water is actually moving through the pipe and exiting cleanly at the discharge point, with no pooling or backup anywhere along the trench. This is the only way to catch a slope problem before the next real storm does it for you.
What This Costs
Professionally installed, a French drain typically runs about $2,000 to $6,500 for a straightforward exterior run, and more for a full exterior system paired with a foundation membrane. As a rough DIY materials estimate — pipe, fabric, and gravel only, before your own labor — homeowners commonly budget somewhere in the neighborhood of $5 to $15 per linear foot, though gravel delivery costs and how much excavation you're doing by hand versus with rented equipment will move that number in either direction. Those are planning ranges, not a quote for your yard; the only way to get an exact number is a site visit, which you can request for free through our job request form if you'd rather have a licensed contractor handle it.
Mistakes That Ruin a French Drain
- Not enough slope, or an inconsistent slope. This is the single most common failure and the hardest one to fix after backfilling — check it constantly while digging, not just at the start and end.
- Skipping the fabric, or using woven weed barrier instead of non-woven fabric. Either mistake lets fine silt into the gravel, and the drain slowly clogs from the inside over one to a few seasons.
- Discharging too close to the foundation. If the water just resurfaces 3 feet from your wall, you haven't solved anything.
- Using gravel with fines mixed in instead of clean, washed stone. Dusty gravel packs down and drains far worse than clean gravel.
- Not calling 811 first. Beyond the safety risk, hitting a utility line can turn a weekend project into an expensive repair.
- Treating a foundation problem as a yard problem. If you're seeing bowing walls, stair-step cracks, or a foundation that's visibly settling, a French drain won't fix that — you need a foundation repair specialist, not a drainage trench.
When I'd Hire a Licensed Contractor Instead
I'd DIY a straightforward exterior run solving a wet-yard or minor foundation-seepage problem on flat-to-moderate terrain. I'd hand this to a licensed pro if any of the following are true: the water table is high enough that you're fighting standing water in the trench as you dig; the route needs to tie into a municipal storm drain, which can require a permit in some Virginia localities; the project is an interior drain tile system requiring concrete demolition; or there's any sign of foundation movement rather than simple surface water. You can compare licensed French drain installers near you on our map, filtered to exactly this service.
Frequently Asked Questions
How deep should a French drain be?
Most exterior French drains run 18 to 24 inches deep and about 12 inches wide, though the right depth depends on your local frost line and how deep the water problem actually originates. Consistency of slope matters more than hitting an exact depth number.
Do I need a permit to install a French drain in Virginia?
It depends on your locality and the project. Simple yard drainage on your own property that discharges onto your own land typically doesn't require a permit, but tying into a municipal storm sewer, working near a property line, or working near a septic system often does. Check with your local building or public works department before you dig if you're unsure.
How long does a properly installed French drain last?
A French drain built with clean gravel, correct fabric, and proper slope commonly lasts 20 to 30 years or more, since there are no moving parts to wear out. The lifespan-limiting factor is almost always silt clogging the gravel over time, which is exactly what the fabric liner is designed to prevent.
Can I install a French drain myself?
Yes, for a straightforward exterior run on land you can safely excavate yourself. I'd still call 811 first, take your time getting the slope right, and use clean gravel and proper filter fabric. If you're dealing with an interior system, a high water table, or any sign of foundation movement, that's a job for a licensed contractor.
What's the difference between a French drain and a sump pump?
A French drain is passive — it moves water by gravity alone and never touches electricity. A sump pump is active — it collects water in a pit and mechanically ejects it, which is necessary when gravity alone can't get the water high enough or far enough away, such as from inside a basement floor. The two are often paired: interior drain tile collects water and gravity-feeds it into a sump pit, where a pump takes over for the final push outside. I cover that combination in how basement waterproofing works.
Conclusion
A French drain is a genuinely simple idea — give water an easier path than the one it's currently taking through your yard or against your foundation — and that simplicity is exactly why it rewards patience over speed. The pipe and gravel are commodity materials; the trench, the slope, and the fabric are where the job is actually won or lost, and every one of those details gets buried the moment you backfill. Take the extra hour to check your slope with a level every few feet, use real filter fabric instead of skipping it, and confirm your discharge point before you call it done. Do that, and there's no reason a well-built French drain shouldn't be quietly doing its job for the next two or three decades. If your situation involves a high water table, an interior system, or any sign the foundation itself is moving, that's the point to stop digging and get a free estimate from a licensed contractor instead.